|
CanvasCV
1.0.0
|


Table of Contents
OpenCV examples and tutorials make heavy use of the console to commuincate with the user.
To start using the GUI instead of the console the first thing you need is to get to know the canvascv::Canvas class.
Introducing the CanvasCV class
The Canvas class is associated with an OpenCV window and it gives you another virtual layer on top of your displayed Mat.
This canvas class encapsulates a lot of work for you, so you can focus on the CV. It also handles key presses and mouse events.
The basic flow is:
- Define a Canvas for a window of a specific size, usually to match the image you're displayng. Canvas c("winName", frame.size());
- Create an OpenCV window without resizing so the widgets cannot be stretched namedWindow("winName", WINDOW_AUTOSIZE); // disable mouse resize
- Let the CanvasCV handle your mouse events c.setMouseCallback(); // optional for mouse usage (see also example_selectbox.cpp)
- Create your widget on the Canvas (or in a frame/layout) for example: auto msgBox = MsgBox::create(c, "Do you really want to do that?", {"Yes", "No"});
- Redraw on your frame/image in your regular OpenCV loop, as in: int delay = 1000/25; // for a single image, delay should be 0int key = -1;Mat out;while (true){c.redrawOn(frame, out); // draws your virtual GUI layer on top of the 'frame'c.imshow(out); // you can also use imshow directly for "winName"key = c.waitKeyEx(delay); // forwards key presses to widgets and shapes}
Some real use cases
Exiting on fatal errors
Your application/utility might need command line arguments, or cannot continue for some reason.
A simple write to the console before exiting is usually not enough to get the user attention.
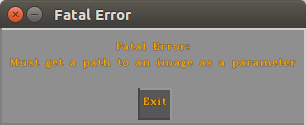
For these simple cases you have a simple shortcut in canvascv::Canvas::fatal():
which, besides an output to STDERR, gives you:
Displaying user text in a fixed location
Instead of displaying the help message or any other fixed text to the console use the canvascv::Canvas::enableScreenText() and canvaccv::Canvas::setScreenText(string) methods.
This flow is a little closer to the regular usage of the Canvas, but you don't need to create a widget of your own.
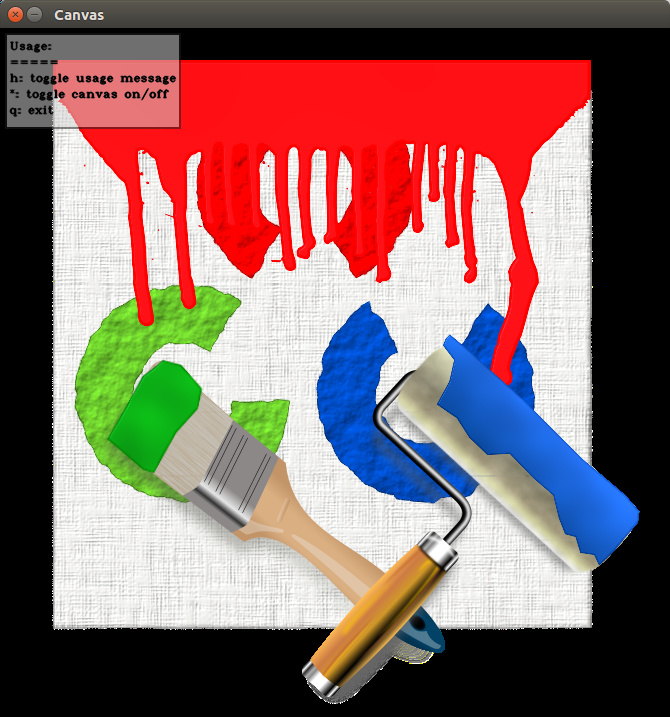
Adding to the previous example (we want to display this on an image):
Some notes here:
- Note the continued use of canvascv::Canvas::fatal().
- Note that we didn't need to use canvascv::Canvas::setMouseCallback() or create a widget of our own here.
- When you canvascv::Canvas::enableScreenText() you can configure it's display.
- As you can see the Canvas instance can be completely turned on and off with the canvascv::Canvas::setOn() method.
- canvascv::Canvas::waitKeyEx() knows to update it's internal shapes and widgets even if you pass 0 as a blocking delay indicator.
- When executed with a path to an image, this gives you (depends on your image):
Displaying text where ever you want
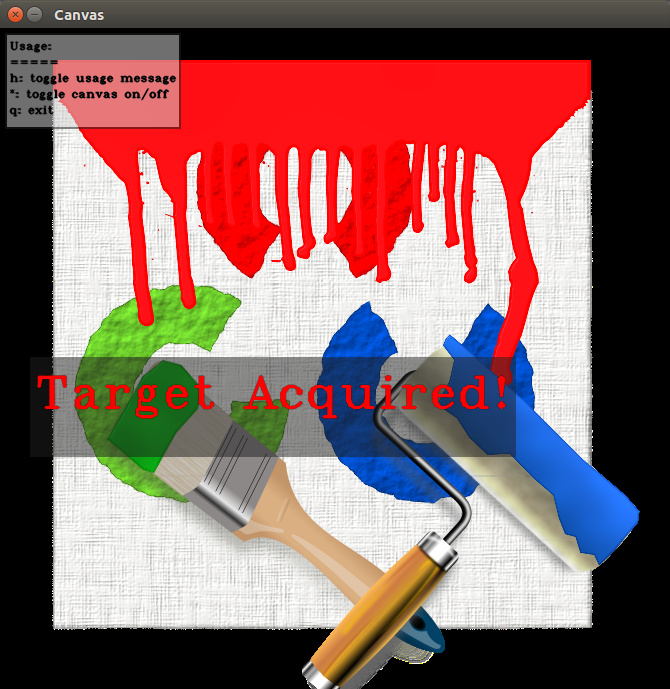
To display text where you want you need the canvascv::Text widget.
You can create position it on the Canvas at any XY location.
Add these lines to the previous example, after creating the namedWindow():
Notes:
- All widgets have a static create methods, which is the only way to create them.
- The canvascv::Text::create() will return a shared_ptr<Text> instance, which you don't have to keep since another one is kept by the canvascv::Layout.
- There are many Colors constants to choose from, see canvascv::Colors.
- The canvascv::Widget::setLocation() gives specific XY postion, but a canvascv::HorizontalLayout could help us put this in the CENTER.
- When executed with a path to an image, this gives you (depends on your image):
That's all for this tutorial
Generated by
 1.8.11
 Linkedin
 Google+