Table of Contents
CanvasCV's support of shapes is one of it's strongest points.
You have 2 ways of creating shapes:
- From the GUI (with the mouse and keyboard) - for example to let the user select a polygon mask as an area of intereset for the CV.
- From the code - for example creating a clickable rectangle on screen to which a SelectionBox widget can be applied.
Creating a polygon from the GUI
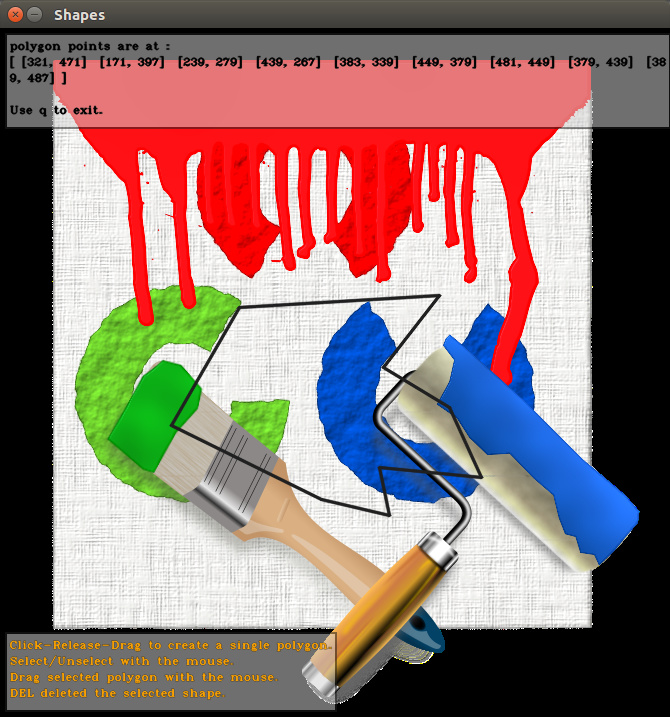
In this example we want to user to mark a polygon area on the image or frame.
There could be various reasons for that:
- Maybe the camera is capturing a large area and we want to operate our algorithm on a relevant dynamic subset of it.
- The user selects a polygon area that triggers an alert when tracked objects are inside it.
- etc.
When the user creates/modifies/deletes the polygon we'll just print the vertices to the screen.
Here is the code:
Notes:
- canvascv::Canvas::enableStatusMsg() is optional, but recommended when using shapes and widgets. It takes a small portion of the screen area, but gives helpful information to the user.
- canvascv::Canvas::setDefaultStatusMsg() is optional. There are built in status messages that are displayed during shape creation and editing. When nothing is selected, then your default status message will be displayed.
- The Canvas needs to know what shape to create when the user left clicks with the mouse. This is done with canvascv::Canvas::setShapeType().
- You can register for Canvas create/modify/delete notification on the Shapes that it creates/modify/deletes. This is the place to react to the user's GUI actions.
- When executed with a path to an image, this gives you (depends on your image):

Creating a clickable rectangle from code
As you know, in CV tracking is split into 2 phases - detection and tracking.
Let's assume we have a people detection code, and we're detecting people in a croud.
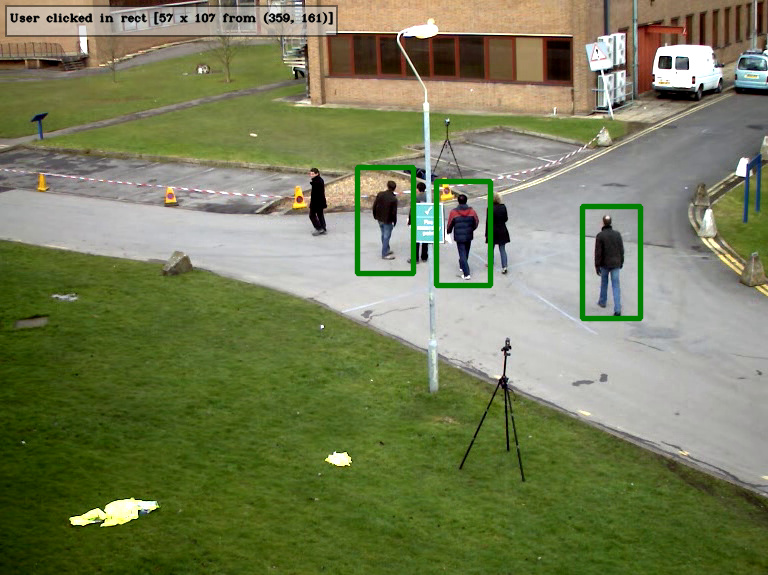
We want to enable the user to choose a specific detection to start tracking. In the most simple form - we want the rectangles we draw to do something when they are clicked.
In this tutorial we won't track anything, but just output the chosen rectangle coordinates to the screen.
The base code we'll be using is from OpenCV-3.2.0/samples/cpp/peopledetect.cpp.
The modified code can be optimized for performance, but here we just want to show the CanvasCV way of doing it.
You are encouraged to diff the tutorial version and the OpenCV version with your favorite diff tool, but the most important difference is this:
In the code above, instead of drawing a rectangle, we create a canvascv::Rectangle object on the Canvas and attach a callback to that specific instance.
The canvascv::Shape::Event we want is SELECT, which is when a shape is selected with the mouse (Clicked).
The full code is a little long because the original code is long:
Notes for the //CanvasCV change#... comments above:
- Here the canvas is cleared at each frame. There are ways to optimize this, but first you'll need to see if this affects your performance at all.
- As a general rule, if the image size changes, then use canvascv::Canvas::setSize() to adapt to the new size.
- When using the CanvasCV, you create shapes and widgets on the canvascv::Canvas and not on the Mat.
- canvascv::Canvas::waitKeyEx() knows to update it's internal shapes and widgets even if you pass 0 as a blocking delay indicator.
- CCV_STR lets you create a string as you would write into a stream.
- When executed with –video="Path to opencv-3.2.0/samples/data/vtest.avi", you can get

That's all for this tutorial
Generated by
 1.8.11


 Facebook
 Linkedin
 Google+